SoapUI can be used as well for automated testing purposes. All the test suites developed through this tool can be executed any way without its user interface, for example using an automated build tool.
The SoapUI test cases can be triggered from a command prompt in several ways: a batch file, a shell script, Maven, etc. This post will focus on Apache Maven (http://maven.apache.org/). I will refer to the release 3.1.1. I suggest the readers to have the basics of Maven and Jenkins (http://jenkins-ci.org/) for a better understanding of this post.
First of all create the pom.xml file for your Maven project. Add the Maven repository from which to download the soapui plugin:
<pluginRepositories>
<pluginRepository>
<id>eviwarePluginRepository</id>
<url>http://www.soapui.org/repository/maven2/</url>
</pluginRepository>
</pluginRepositories>
Then setup the SoapUI plugin for Maven. We are going to use the SoapUI project created in the previous post (http://googlielmo.blogspot.ie/2014/02/soapui-part-2-testing-soap-web-services.html):
<plugins>
<plugin>
<groupId>eviware</groupId>
<artifactId>maven-soapui-plugin</artifactId>
<version>4.5.1</version>
<configuration>
<projectFile>WheaterForecastTest-soapui-project.xml</projectFile>
</configuration>
</plugin>
</plugins>
The XML file WheaterForecastTest-soapui-project.xml is the SoapUI project contaning the test case(s) you want to execute through Maven (have a look at the previous post for it). The final pom.xml should be something like this:
<?xml version="1.0" encoding="UTF-8"?>
<project>
<modelVersion>4.0.0</modelVersion>
<groupId>com.blogspot.googlielmo</groupId>
<artifactId>soapui-example</artifactId>
<version>1.0-SNAPSHOT</version>
<pluginRepositories>
<pluginRepository>
<id>eviwarePluginRepository</id>
<url>http://www.soapui.org/repository/maven2/</url>
</pluginRepository>
</pluginRepositories>
<build>
<plugins>
<plugin>
<groupId>eviware</groupId>
<artifactId>maven-soapui-plugin</artifactId>
<version>4.5.1</version>
<configuration>
<projectFile>WheaterForecastTest-soapui-project.xml</projectFile>
</configuration>
</plugin>
</plugins>
</build>
</project>
You can run it by a shell command through the following Maven command:
mvn eviware:maven-soapui-plugin:test
If everthing goes fine you should see an output like this:
2014-03-09 20:11:39,111 INFO [DefaultSoapUICore] initialized soapui-settings from [C:\Users\chief\soapui-settings.xml]
2014-03-09 20:11:40,231 INFO [WsdlProject] Loaded project from [file:/C:/Guglielmo/Code/Maven/SoapUI/WheaterForecastTest-soapui-project.xml]
2014-03-09 20:11:40,977 INFO [SoapUITestCaseRunner] Running soapUI tests in project [WheaterForecastTest]
2014-03-09 20:11:40,979 INFO [SoapUITestCaseRunner] Running Project [WheaterForecastTest], runType = SEQUENTIAL
2014-03-09 20:11:40,999 INFO [SoapUITestCaseRunner] Running soapUI testcase [GetCitiesByCountry TestCase]
2014-03-09 20:11:41,012 INFO [SoapUITestCaseRunner] running step [GetCitiesByCountry]
2014-03-09 20:11:41,977 INFO [SoapUITestCaseRunner] Assertion [Contains] has status VALID
2014-03-09 20:11:41,978 INFO [SoapUITestCaseRunner] Finished running soapUI testcase [GetCitiesByCountry TestCase], time taken: 945ms, status: FINISHED
2014-03-09 20:11:41,982 INFO [SoapUITestCaseRunner] Running soapUI testcase [GetWeather TestCase]
2014-03-09 20:11:41,983 INFO [SoapUITestCaseRunner] running step [GetWeather]
2014-03-09 20:11:42,216 INFO [SoapUITestCaseRunner] Finished running soapUI testcase [GetWeather TestCase], time taken: 232ms, status: FINISHED
2014-03-09 20:11:42,217 INFO [SoapUITestCaseRunner] Project [WheaterForecastTest] finished with status [FINISHED] in 1231ms
If you look at the lines in bold, you can notice that the test case GetCitiesByCountry defined in the last post was successfully executed the same way as using the tool UI.
This same action could be automated through a build server like Jenkins. Connect to the Jenkins dashboard and create a new job. The type of this job has to be Build a Maven 2/3 project. The name chosen for this job is SoapUI-WheaterForecast. In order for Jenkins to execute this job you need to have Maven configured for it. Check for it in the Maven section of the Configure Jenkins -> Manage System area. In order to configure the job you need to set the Build section this way:

You need to add the full path of the pom.xml file in your Jenkins server and the same Maven command and params used to run the TestCase from a command line. Save the changes and run manually the job. At the end of the execution go to the jobs console output for this build and you should see the same output as for the run from a command line:
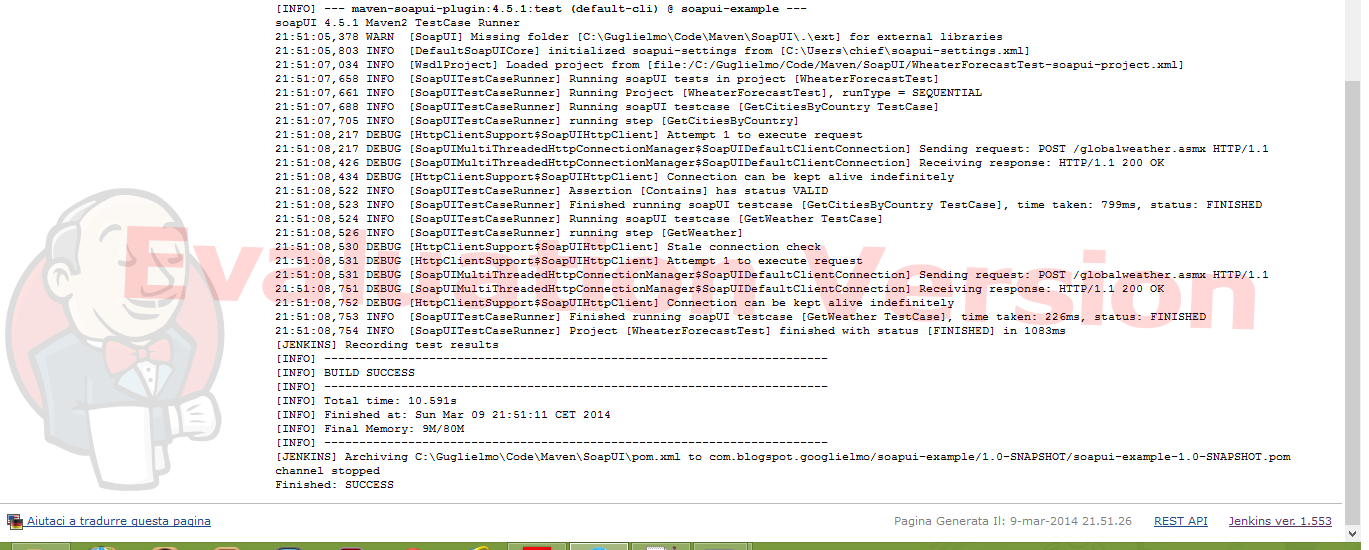
This job can then scheduled the usual way for any Jenkins job.
This is what you should have learned from this example: it's possible to automate the verification and test of APIs using SoapUI. The chances of securing the delivery of high quality APIs will be drastically improved, compared to when testing services using homegrown API clients. This helps to save a lot of time and allows to focus on the real problem, testing, instead of the problem nested creating custom test tools.
The SoapUI test cases can be triggered from a command prompt in several ways: a batch file, a shell script, Maven, etc. This post will focus on Apache Maven (http://maven.apache.org/). I will refer to the release 3.1.1. I suggest the readers to have the basics of Maven and Jenkins (http://jenkins-ci.org/) for a better understanding of this post.
First of all create the pom.xml file for your Maven project. Add the Maven repository from which to download the soapui plugin:
<pluginRepositories>
<pluginRepository>
<id>eviwarePluginRepository</id>
<url>http://www.soapui.org/repository/maven2/</url>
</pluginRepository>
</pluginRepositories>
Then setup the SoapUI plugin for Maven. We are going to use the SoapUI project created in the previous post (http://googlielmo.blogspot.ie/2014/02/soapui-part-2-testing-soap-web-services.html):
<plugins>
<plugin>
<groupId>eviware</groupId>
<artifactId>maven-soapui-plugin</artifactId>
<version>4.5.1</version>
<configuration>
<projectFile>WheaterForecastTest-soapui-project.xml</projectFile>
</configuration>
</plugin>
</plugins>
The XML file WheaterForecastTest-soapui-project.xml is the SoapUI project contaning the test case(s) you want to execute through Maven (have a look at the previous post for it). The final pom.xml should be something like this:
<?xml version="1.0" encoding="UTF-8"?>
<project>
<modelVersion>4.0.0</modelVersion>
<groupId>com.blogspot.googlielmo</groupId>
<artifactId>soapui-example</artifactId>
<version>1.0-SNAPSHOT</version>
<pluginRepositories>
<pluginRepository>
<id>eviwarePluginRepository</id>
<url>http://www.soapui.org/repository/maven2/</url>
</pluginRepository>
</pluginRepositories>
<build>
<plugins>
<plugin>
<groupId>eviware</groupId>
<artifactId>maven-soapui-plugin</artifactId>
<version>4.5.1</version>
<configuration>
<projectFile>WheaterForecastTest-soapui-project.xml</projectFile>
</configuration>
</plugin>
</plugins>
</build>
</project>
You can run it by a shell command through the following Maven command:
mvn eviware:maven-soapui-plugin:test
If everthing goes fine you should see an output like this:
2014-03-09 20:11:39,111 INFO [DefaultSoapUICore] initialized soapui-settings from [C:\Users\chief\soapui-settings.xml]
2014-03-09 20:11:40,231 INFO [WsdlProject] Loaded project from [file:/C:/Guglielmo/Code/Maven/SoapUI/WheaterForecastTest-soapui-project.xml]
2014-03-09 20:11:40,977 INFO [SoapUITestCaseRunner] Running soapUI tests in project [WheaterForecastTest]
2014-03-09 20:11:40,979 INFO [SoapUITestCaseRunner] Running Project [WheaterForecastTest], runType = SEQUENTIAL
2014-03-09 20:11:40,999 INFO [SoapUITestCaseRunner] Running soapUI testcase [GetCitiesByCountry TestCase]
2014-03-09 20:11:41,012 INFO [SoapUITestCaseRunner] running step [GetCitiesByCountry]
2014-03-09 20:11:41,977 INFO [SoapUITestCaseRunner] Assertion [Contains] has status VALID
2014-03-09 20:11:41,978 INFO [SoapUITestCaseRunner] Finished running soapUI testcase [GetCitiesByCountry TestCase], time taken: 945ms, status: FINISHED
2014-03-09 20:11:41,982 INFO [SoapUITestCaseRunner] Running soapUI testcase [GetWeather TestCase]
2014-03-09 20:11:41,983 INFO [SoapUITestCaseRunner] running step [GetWeather]
2014-03-09 20:11:42,216 INFO [SoapUITestCaseRunner] Finished running soapUI testcase [GetWeather TestCase], time taken: 232ms, status: FINISHED
2014-03-09 20:11:42,217 INFO [SoapUITestCaseRunner] Project [WheaterForecastTest] finished with status [FINISHED] in 1231ms
If you look at the lines in bold, you can notice that the test case GetCitiesByCountry defined in the last post was successfully executed the same way as using the tool UI.
This same action could be automated through a build server like Jenkins. Connect to the Jenkins dashboard and create a new job. The type of this job has to be Build a Maven 2/3 project. The name chosen for this job is SoapUI-WheaterForecast. In order for Jenkins to execute this job you need to have Maven configured for it. Check for it in the Maven section of the Configure Jenkins -> Manage System area. In order to configure the job you need to set the Build section this way:
You need to add the full path of the pom.xml file in your Jenkins server and the same Maven command and params used to run the TestCase from a command line. Save the changes and run manually the job. At the end of the execution go to the jobs console output for this build and you should see the same output as for the run from a command line:
This job can then scheduled the usual way for any Jenkins job.
This is what you should have learned from this example: it's possible to automate the verification and test of APIs using SoapUI. The chances of securing the delivery of high quality APIs will be drastically improved, compared to when testing services using homegrown API clients. This helps to save a lot of time and allows to focus on the real problem, testing, instead of the problem nested creating custom test tools.
Comments
Post a Comment